Moss on Your Chimney: How to Remove It Safely and Stop It Coming Back
Why Seattle Chimneys Get Covered in Moss (And Why It Actually Matters)
Moss doesn't grow on chimneys randomly. It establishes on surfaces that stay damp for extended periods — and in Seattle, chimney masonry does exactly that. With 152 rain days per year, persistent overcast that limits drying sunlight, and heavy tree canopy over most of the city's residential neighborhoods, Seattle chimneys provide near-ideal conditions for moss colonization: cool, consistently moist, slightly acidic brick and mortar that sits in partial shade for much of the year.
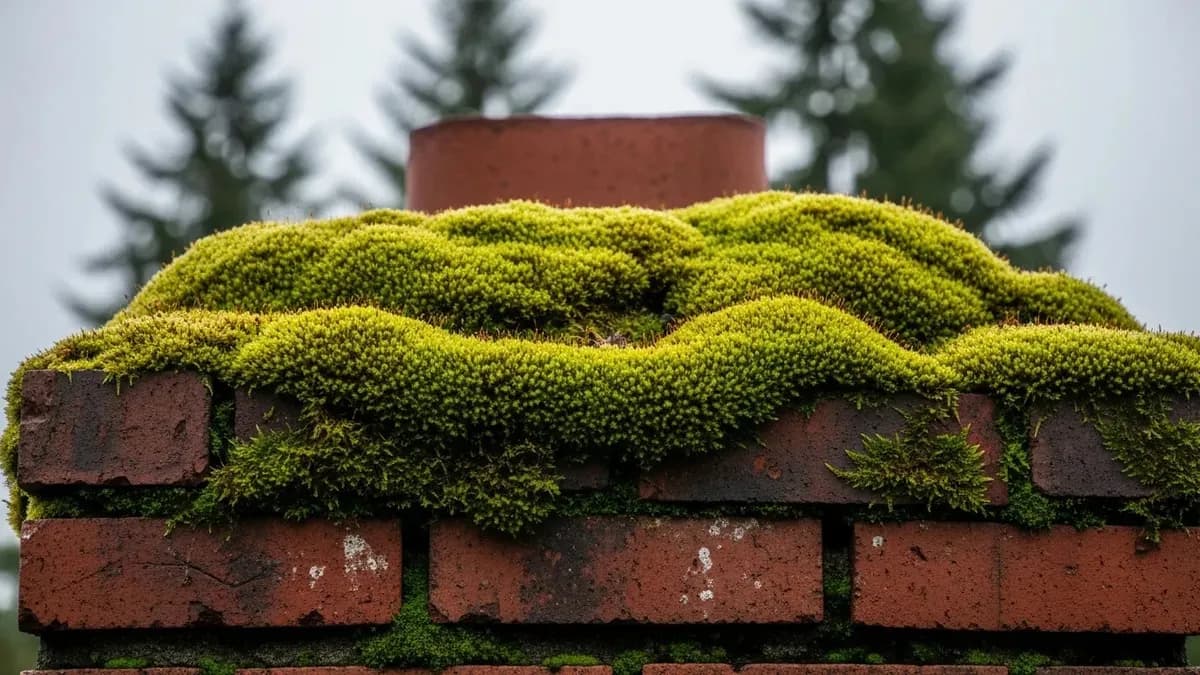
In neighborhoods like Madrona, Leschi, Laurelhurst, and Ravenna, where mature tree canopy creates deep shade over rooftops, it's common to see chimneys that are almost completely covered in moss on the north and east faces within 5–10 years on a house that's never been treated. Even in more open neighborhoods like Ballard, West Seattle, and Beacon Hill, chimneys routinely develop moss growth on faces that don't get direct afternoon sun.
Most Seattle homeowners notice the growth and assume it's a cosmetic issue — an inevitable artifact of living in the Pacific Northwest. That assumption is understandable but costly. Moss is not merely a surface stain. It is a living organism with root structures (called rhizoids) that penetrate the porous surface of brick and mortar, holding moisture against the masonry surface and actively widening microscopic fissures in mortar joints as growth expands.
The mechanism of damage is the same freeze-thaw deterioration that affects all unprotected Seattle masonry — but moss accelerates it. A bare brick chimney absorbs rain water and dries. A moss-covered chimney absorbs rain water and is then covered by a layer of biological material that holds that water in contact with the masonry surface for days longer than it would stay wet otherwise. In Seattle's October-through-March freeze-thaw season, that extra water retention translates directly to more ice expansion cycles per winter, and faster mortar joint erosion and brick spalling than a bare chimney would experience.
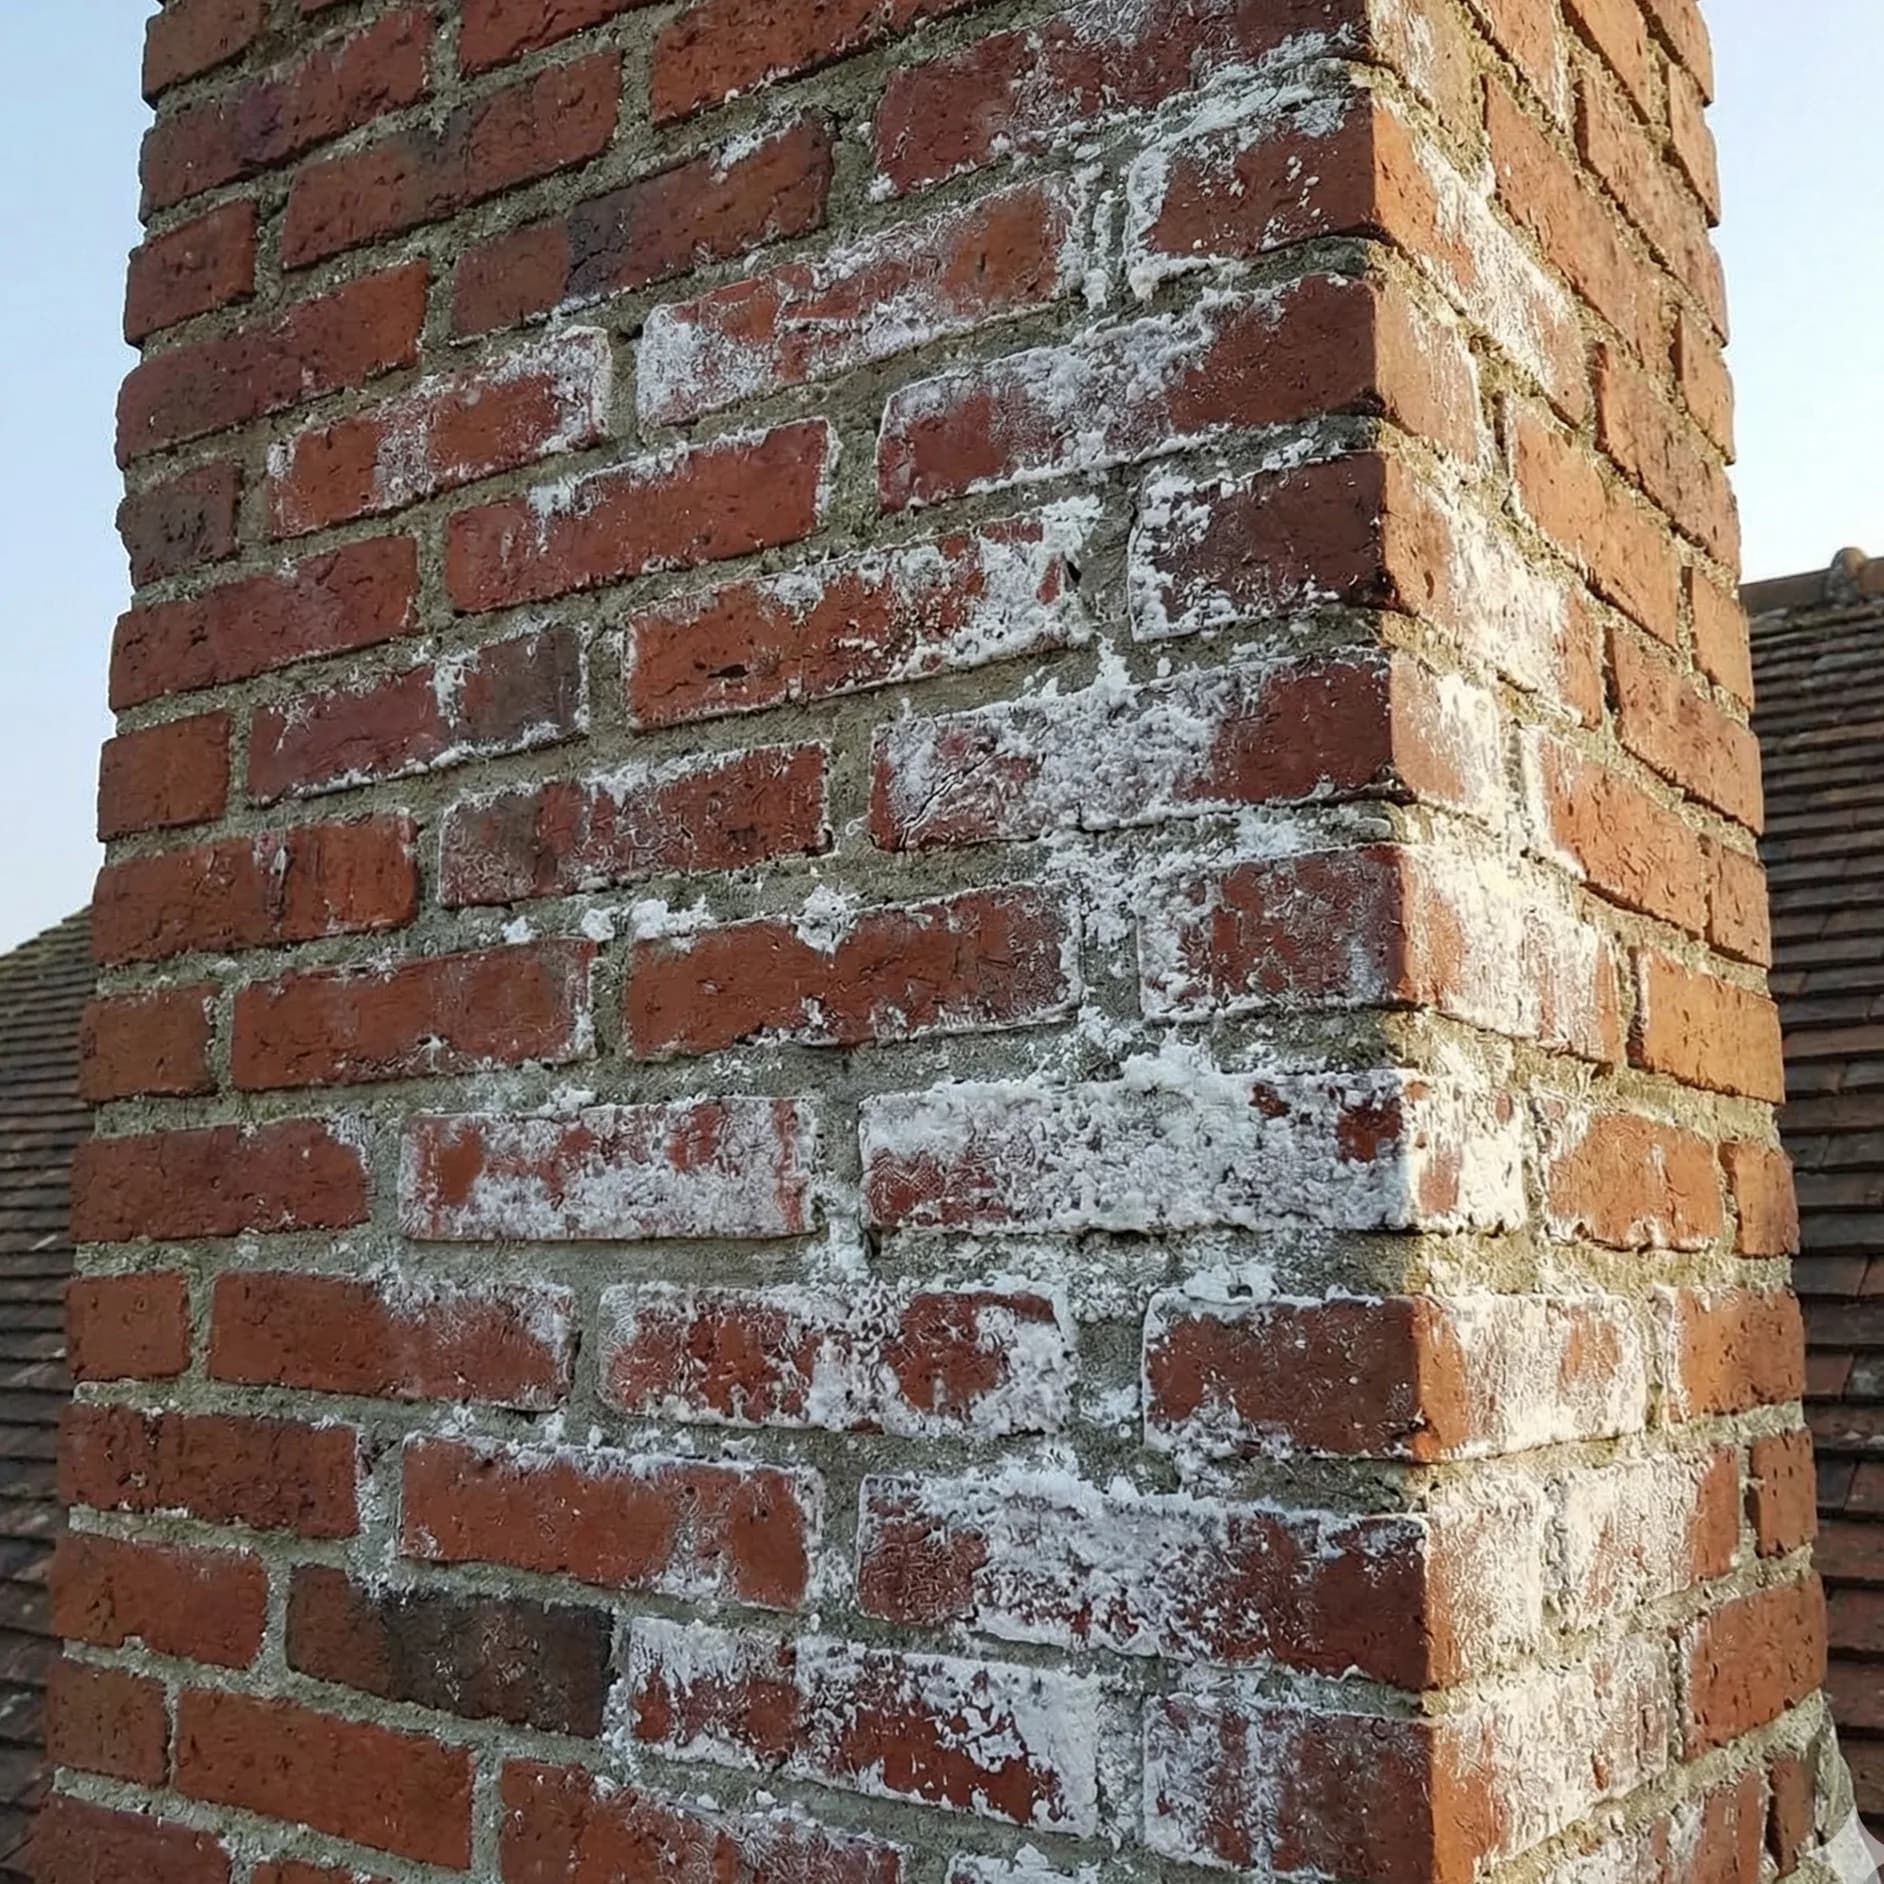
We've seen on Seattle rooftops that a chimney with heavy moss colonization that hasn't been treated for 10–15 years often has mortar joints that are noticeably softer and more receded than the surrounding brick — the direct result of accelerated moisture retention. Left untreated, that mortar deterioration reaches the point of requiring full chimney tuckpointing at $600–$2,500, or in severe cases, partial chimney rebuilding at $3,000–$10,000+. The moss treatment that would have prevented that typically costs $150–$400.
Moss vs. Lichen vs. Algae: Identifying What's Growing on Your Chimney
Not everything green or black on your chimney is moss, and the identification matters because removal methods and urgency differ. Seattle chimneys commonly host all three types of biological growth, often simultaneously on different faces of the same structure.
- Moss is a non-vascular plant with visible leaf-like structures, typically bright green when wet and brownish-green or brown when dry. It forms a soft, spongy mat on the masonry surface. Moss grows from spores carried by wind and rain and establishes most readily on north-facing surfaces and those with consistent moisture and shade. In Seattle, it's the most common chimney colonizer and the most structurally damaging, because its rhizoids penetrate mortar joints more aggressively than algae or lichen. Moss can reach 1–3 inches thick on heavily colonized surfaces and retains water for extended periods.
- Lichen is a symbiotic organism combining algae and fungi. It appears as flat, crusty growth — gray, green, orange, or yellow — that is tightly bonded to the masonry surface and does not have the soft, leafy texture of moss. Lichen is slower-growing than moss but significantly harder to remove once established, because it chemically bonds to the masonry surface rather than just growing on it. Lichen's fungal component produces mild acids that slowly etch brick and mortar surfaces. In Seattle, lichen is most common on chimneys that have been moss-colonized for many years — lichen often establishes after moss has created a hospitable moist microclimate.
- Algae is the least structurally damaging of the three. It appears as dark green, blue-green, or black streaking and staining on masonry surfaces — often the dark streaks running down from the top of the chimney that homeowners notice after wet seasons. Algae is single-celled and doesn't have root structures that penetrate masonry, but it indicates persistent moisture and contributes to the discoloration that leads homeowners to look more carefully and find underlying moss or lichen. Black staining on Seattle chimneys is usually Gloeocapsa magma (blue-green algae) or a similar species.
For removal purposes: moss is best treated with chemical treatment followed by mechanical removal; lichen requires stronger chemical treatment and longer dwell time; algae is the most straightforward and often comes off with cleaning solution alone. The table below summarizes key differences:
| Type | Appearance | Structural Damage | Removal Difficulty | Prevention Treatment |
|---|---|---|---|---|
| Moss | Soft green/brown mat, leafy texture | High — rhizoids penetrate mortar, holds moisture | Moderate — chemical + brush | Zinc/copper treatment, waterproofing |
| Lichen | Crusty flat patches, gray/green/orange | Moderate — acid etching of surface | High — chemically bonded to surface | Zinc/copper treatment, biocide sealers |
| Algae | Dark streaking, green/black staining | Low — surface only, no penetration | Low — cleaning solution | Biocide wash, proper drainage |
How to Remove Moss from a Chimney: Methods, Safety, and What Works in Seattle
Moss removal from chimney masonry involves three phases: killing the growth, physical removal of dead material, and preventive treatment. In Seattle's climate, skipping the preventive phase means the moss returns within 2–3 years without exception.
Phase 1: Kill the Moss First
Attempting to scrub live moss off masonry is ineffective — you remove the visible growth but leave rhizoids embedded in the mortar joints, and regrowth begins immediately. Kill the moss first, then remove it.
- Zinc sulfate solution: The most widely used professional moss-kill treatment for masonry. Zinc is toxic to moss and other bryophytes but safe for masonry surfaces and relatively benign environmentally. Applied as a liquid solution, allowed to dwell 24–48 hours, then the dead moss can be removed. Zinc sulfate is available in hardware stores (commonly sold as 'moss killer' or 'zinc sulfate monohydrate') and is the active ingredient in most professional chimney moss treatments. It also leaves a residual zinc presence in the masonry that continues to inhibit regrowth.
- Diluted bleach solution (sodium hypochlorite): Effective at killing moss and algae quickly — a 1:3 ratio of bleach to water applied and allowed to dwell 15–20 minutes will kill surface moss. However, bleach does not leave a residual preventive effect, it can discolor some brick types, and repeated application degrades mortar over time. For chimney masonry, zinc sulfate is generally preferred over bleach for professional treatment. If using bleach as a homeowner, protect surrounding vegetation and rinse thoroughly.
- Potassium soap (soft soap) solutions: Biodegradable, less aggressive, and safe for masonry. These work well on algae and light moss but are less effective on heavy colonization or established lichen. Often used as a pre-treatment wash before applying zinc sulfate.
- Commercial moss killers: Products like Wet & Forget, Moss Out, and similar retail products use proprietary formulations of ammonium, benzalkonium chloride, or other biocides. These are effective on moss and algae and are popular for roof applications. For chimney masonry specifically, verify the product is rated for use on brick and mortar before applying.
Phase 2: Remove Dead Moss
Once the moss is dead (typically brown and dry within 1–3 days of treatment), it can be removed mechanically:
- Stiff-bristle nylon brush: The correct tool for chimney masonry. Scrub in circular motions to break up the dead growth and lift it from the brick surface and mortar joints. A nylon bristle brush is aggressive enough to remove debris without scoring brick faces. Wire brushes are too aggressive for most brick types and can damage mortar joints and brick faces — avoid them on chimney masonry.
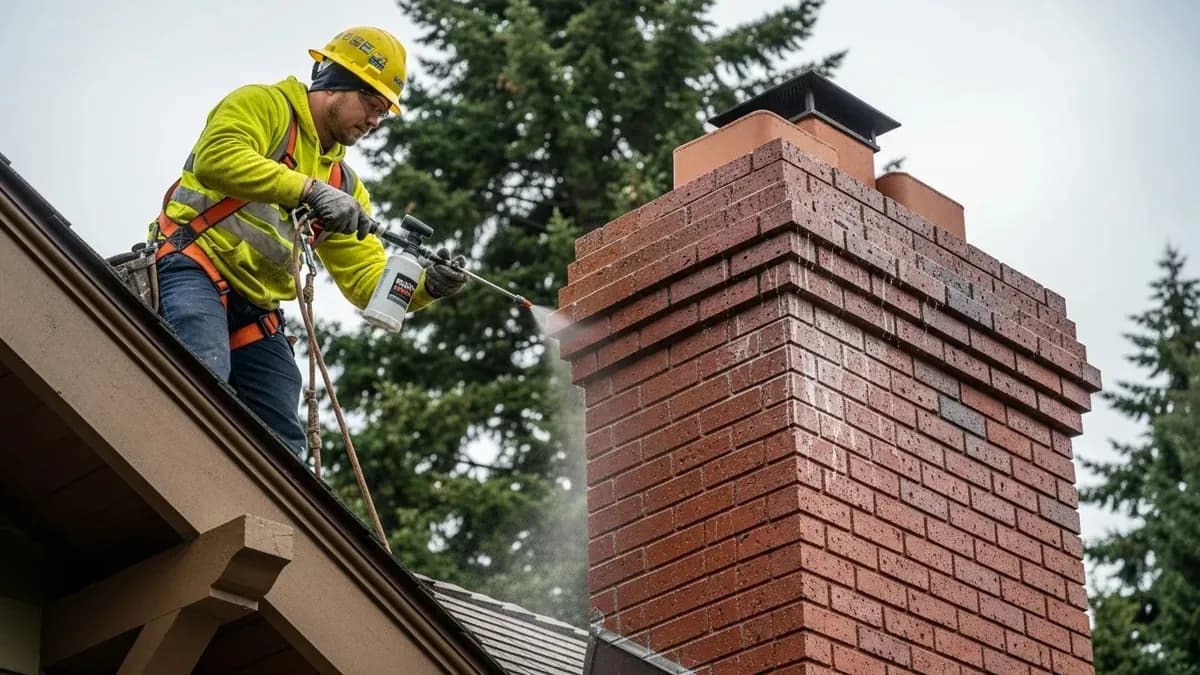
- Low-pressure rinsing: After brushing, rinse the surface with a garden hose or a pressure washer at low setting (below 500 PSI) to flush away loosened debris. Do not use a pressure washer at standard cleaning pressure (1,200–2,500 PSI) on chimney masonry — high-pressure water erodes mortar joints, particularly in Seattle's older brick that has already experienced some weathering. This is one of the most common DIY damage patterns we see: homeowners pressure-washing moss off chimneys and accelerating mortar joint erosion in the process.
Phase 3: Prevention Treatment
After removal, apply a preventive treatment to delay or prevent regrowth. Without this step, moss returns. Prevention options include:
- Zinc strip installation: A 6-inch-wide strip of zinc flashing installed at the chimney top causes zinc ions to leach down the masonry surface in every rain event, creating an environment that inhibits moss and algae growth. Zinc strips are widely used for roof moss prevention throughout the Pacific Northwest and work effectively on chimney masonry as well. A single zinc strip installation lasts 10–20 years and is one of the most cost-effective long-term moss prevention investments. Cost for professional installation: $75–$150.
- Waterproofing sealant application: Applying a vapor-permeable silane/siloxane waterproofing sealant after cleaning and moss removal removes the moisture retention environment that moss requires. Without consistent surface moisture, moss colonization is significantly slower. Waterproofing is the most comprehensive prevention strategy because it addresses the root cause — masonry moisture absorption — rather than just treating biological symptoms. See our guide to chimney waterproofing costs in Seattle for complete pricing and product information.
- Annual biocide application: Some Seattle homeowners apply a diluted zinc sulfate or commercial biocide solution to chimney masonry each spring as a maintenance step to kill any new moss growth before it establishes. This is a lower-cost annual approach compared to a full treatment cycle.
Professional Chimney Moss Removal Cost in Seattle: 2026 Pricing
Professional chimney moss removal in Seattle typically costs $150–$500 for a standard single-flue residential chimney, depending on the extent of growth, roof accessibility, and whether the service includes preventive treatment. The following ranges reflect 2026 market pricing for the Seattle metro area.
| Service | Seattle 2026 Range | What's Included |
|---|---|---|
| Basic moss removal (light to moderate growth) | $150–$275 | Chemical treatment, mechanical removal, rinse; standard single-flue chimney with accessible roof |
| Moss removal + zinc strip installation | $225–$400 | Removal plus installation of zinc prevention strip at chimney top; most cost-effective long-term combination |
| Moss removal + waterproofing | $400–$750 | Full removal plus vapor-permeable sealant application; maximum protection against both moss and freeze-thaw damage |
| Heavy or lichen colonization | $250–$500 | Extended chemical dwell time, additional mechanical work; lichen removal requires more product and labor |
| Chimney moss removal + chimney sweep | $300–$550 | Moss removal combined with annual chimney sweep service; lower per-visit cost vs. two separate appointments |
| Mortar joint repair after moss damage | $200–$1,500+ | Tuckpointing or spot repointing if moss damage has eroded mortar joints; extent-dependent; billed separately from moss treatment |
The most common reason costs exceed the base range is roof accessibility: Seattle's craftsman and Victorian homes tend to have 8/12 to 12/12 roof pitches (steep enough to require safety equipment and slower work), and chimneys that sit high above the roofline add ladder extension requirements. Combining moss removal with a chimney inspection or chimney sweep in the same visit typically reduces the effective cost of each service compared to separate calls.
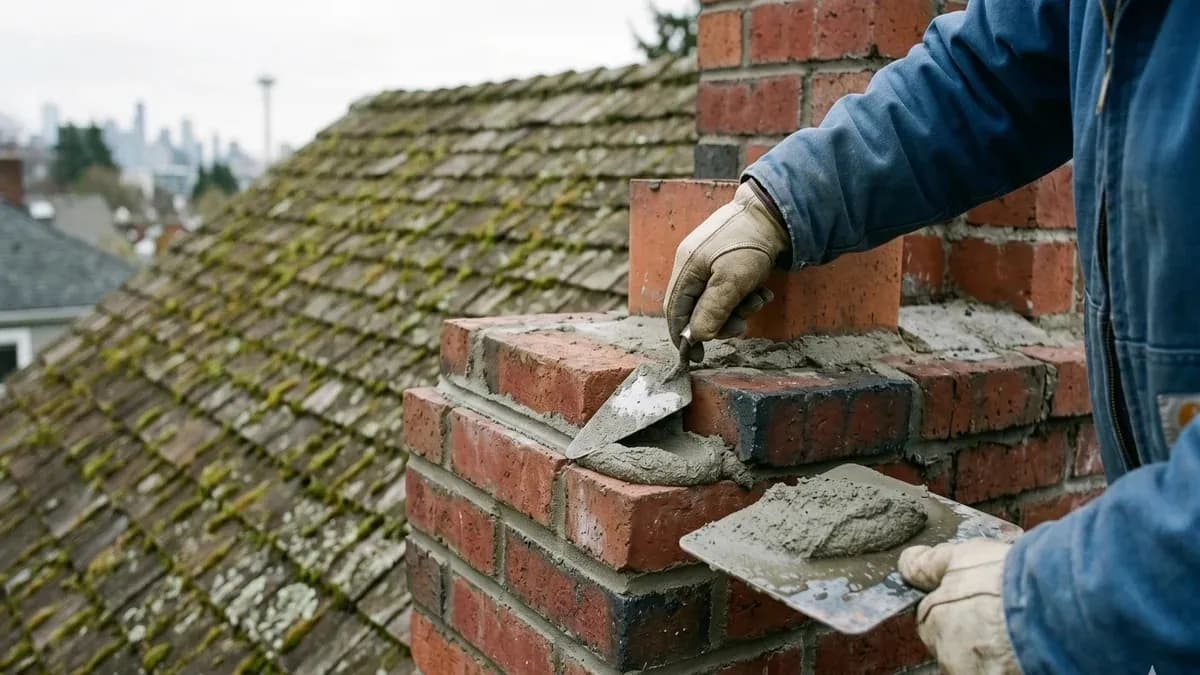
If moss treatment has been delayed to the point where mortar joint damage is visible — recessed joints, crumbling mortar, or brick faces beginning to spall — budget for tuckpointing costs in addition to moss treatment. Tuckpointing deteriorated joints before applying any treatment or waterproofing is required for those services to be effective.
DIY Chimney Moss Removal: What You Can Safely Do Yourself
The honest assessment of DIY chimney moss removal depends heavily on your roof access situation — and in Seattle, that situation is frequently less safe than homeowners assume.
Where DIY moss treatment is feasible:
- Single-story homes with low-slope roofs where the chimney base is accessible with a standard extension ladder and safe footing
- Chimneys where visible moss growth is on accessible faces reachable from the ladder without moving onto the roof surface
- Light to moderate moss growth, not lichen (which requires stronger treatment and longer dwell time)
For these situations, a homeowner can effectively apply a zinc sulfate solution, allow it to dwell, and use a nylon brush and garden hose to remove dead growth. The materials cost $30–$80 and the result, if done correctly with proper product specification, is comparable to a basic professional treatment.
Where DIY stops being the right call:
- Steep-pitched roofs: Seattle's craftsman homes routinely have 9/12 to 12/12 pitches. Working on these roofs without professional fall protection equipment (harnesses, ridge anchors, roof jacks) is genuinely dangerous. Ladder injuries and falls from roofs are leading causes of serious homeowner injuries nationwide. The $150–$300 cost difference between DIY and professional doesn't justify the risk.
- Two-story or taller chimneys: A chimney that requires a 28+ foot extension ladder to reach is at the edge of safe homeowner ladder use even on flat ground, and nearly impossible to work safely on at roof level.
- Heavy lichen growth: Lichen removal requires extended chemical dwell time (sometimes multiple applications over days), more aggressive mechanical removal, and in some cases professional-grade cleaning solutions. DIY attempts at lichen removal on brick frequently result in incomplete removal or surface abrasion from attempting to scrub off what chemical treatment hasn't fully killed.
- When mortar damage is already present: If you can see recessed or crumbling mortar joints, any work on the chimney — including moss treatment — should be preceded by a professional assessment. Applying chemical treatments or mechanical scrubbing to already-deteriorated masonry can accelerate damage.
Does Moss on a Chimney Mean You Have a Leak?
This is the question homeowners most often ask when they first notice chimney moss — and the answer is: not necessarily, but it does mean the conditions that lead to leaks are present.
Moss establishes on masonry that stays consistently moist — not on masonry that leaks but dries quickly. An actively leaking chimney often shows different signs: water stains on interior walls or ceilings near the fireplace, rust staining inside the firebox, efflorescence (white mineral deposits) on the exterior brickwork, or spalling brick faces. These are active moisture migration symptoms.
Moss growth, by contrast, indicates surface moisture retention — the masonry stays wet long enough for moss to grow, but that water may be staying on the exterior surface rather than penetrating into the chimney structure. Whether that exterior moisture eventually becomes an interior leak depends on the condition of the masonry itself: sound, intact mortar joints with no cracks or gaps are much better at keeping surface moisture out than deteriorated joints.
However — and this is the important nuance — moss accelerates the deterioration of mortar joints that eventually allows moisture to penetrate. A chimney with heavy long-term moss growth that has never been treated is working its way toward active leaking even if it doesn't currently leak. The rhizoids widening mortar joints, the extended moisture exposure accelerating freeze-thaw cycles, the gradual erosion of joint material — these create the conditions for a future leak.
If your chimney has visible moss and you're experiencing any water intrusion symptoms — damp smell, rust in the firebox, water stains near the fireplace wall — schedule a chimney inspection to identify the water entry point before treating the moss. Our guide to why chimneys leak when it rains explains how to diagnose whether the source is masonry absorption, flashing failure, a cracked crown, or a missing cap — all of which require different repair approaches.
Moss alone, without active water intrusion symptoms: schedule treatment and prevention. Moss plus water symptoms: inspection first, then treatment as part of a comprehensive water management plan.
When Is the Best Time to Remove Chimney Moss in Seattle?
Spring — and specifically May through June — is the optimal window for chimney moss removal in Seattle for several reasons that are specific to the Pacific Northwest climate.
Moss is most vulnerable in spring: Moss is actively growing in Seattle from February through May, with peak growth occurring during the transition from cool wet winter to warm dry summer. Applying biocidal treatment during active growth is more effective than treating dormant moss in winter, because the plant is metabolically active and absorbing the treatment more efficiently.
Spring conditions favor drying: After treatment and removal, exposed masonry benefits from dry conditions to begin the natural drying process before the next wet season. Seattle's May-June window is reliably drier than the rest of the year, giving cleaned and treated masonry the best conditions for preparation before fall rains return.
Timing treatment before waterproofing: Moss removal and waterproofing work together as a spring maintenance sequence: remove moss and biological growth in May, allow masonry to fully dry (7–14 days), then apply waterproofing sealant. Trying to compress these into a single visit is possible but the masonry isn't as receptive to waterproofing sealant penetration immediately after wet cleaning. Scheduling both services in a spring maintenance window with appropriate drying time between them gives the best result.
Scheduling availability: Spring is the best season for chimney service scheduling in Seattle. Fall (September-November) is peak demand season — every homeowner scheduling their chimney for winter prep simultaneously. Spring appointments run 5–7 days lead time; fall runs 3–6 weeks. For services that benefit from dry conditions and good scheduling flexibility, spring is clearly preferable.
Our 14+ years of Seattle-area chimney service confirms that homeowners who treat and waterproof in spring, before moss regrows and before the fall rainy season returns, dramatically reduce the rate of masonry deterioration compared to those who defer until fall or winter maintenance.
Schedule Chimney Moss Removal in Seattle This Spring
Seattle Chimney Pros removes moss, algae, and lichen from masonry chimneys throughout the Seattle metro — from the heavy-canopy neighborhoods of Madrona, Leschi, and Ravenna where moss colonization is most aggressive, to Queen Anne, Ballard, and Capitol Hill craftsman homes where steep roof pitches make safe access the key challenge, and across the South Sound communities including Tacoma, Renton, and Auburn.
Our moss treatment service uses zinc sulfate-based professional treatment products applied by CSIA-certified technicians with proper fall protection for safe work on Seattle's steep residential roofs. We assess the extent of moss, algae, and lichen growth, evaluate underlying masonry condition, and give you a clear picture of whether any mortar repairs are needed before or alongside treatment. We don't apply biocide over deteriorated masonry and call it done — if the joints need attention, we tell you and give you a repair estimate that's honest about scope and cost.
For Seattle homes with heavy moss that haven't been treated in 5+ years, we typically recommend the combined moss removal, zinc strip installation, and waterproofing sequence for comprehensive long-term protection. For lighter growth on newer or previously treated masonry, moss treatment alone or with zinc strips is often sufficient. We'll assess and recommend based on what we actually find — not on upselling a service you don't need.
Spring scheduling is available now with appointments typically available within 5–7 business days across King, Pierce, and Snohomish counties. To schedule a chimney moss assessment and treatment estimate, call (253) 429-8006 or request a free estimate online. Combining moss treatment with a chimney inspection or sweep in the same visit reduces your total service cost — ask about scheduling both when you call.
Need professional help?
Our professionally trained team is ready. Free estimate, 30-minute response.